¶ What is Zendure Home Assistant and How Does It Run?
The Zendure Home Assistant (HA) Integration is a robust custom component—available via the Home Assistant Community Store (HACS) on GitHub—designed to seamlessly incorporate your Zendure ecosystem (such as the SolarFlow series) into your Home Assistant server. While the native Zendure mobile application provides excellent AI-driven energy scheduling, this integration is engineered for advanced users seeking absolute, granular control over their home energy systems.
By bridging your photovoltaic generation and battery storage with your broader smart home infrastructure, the Zendure HA integration enhances energy independence, maximises solar self-consumption, and significantly reduces grid reliance.
¶ Key Features and Functional Capabilities
The integration exposes a comprehensive set of binary sensors, diagnostic entities, and control switches directly into the Home Assistant ecosystem, enabling the following core functionalities:
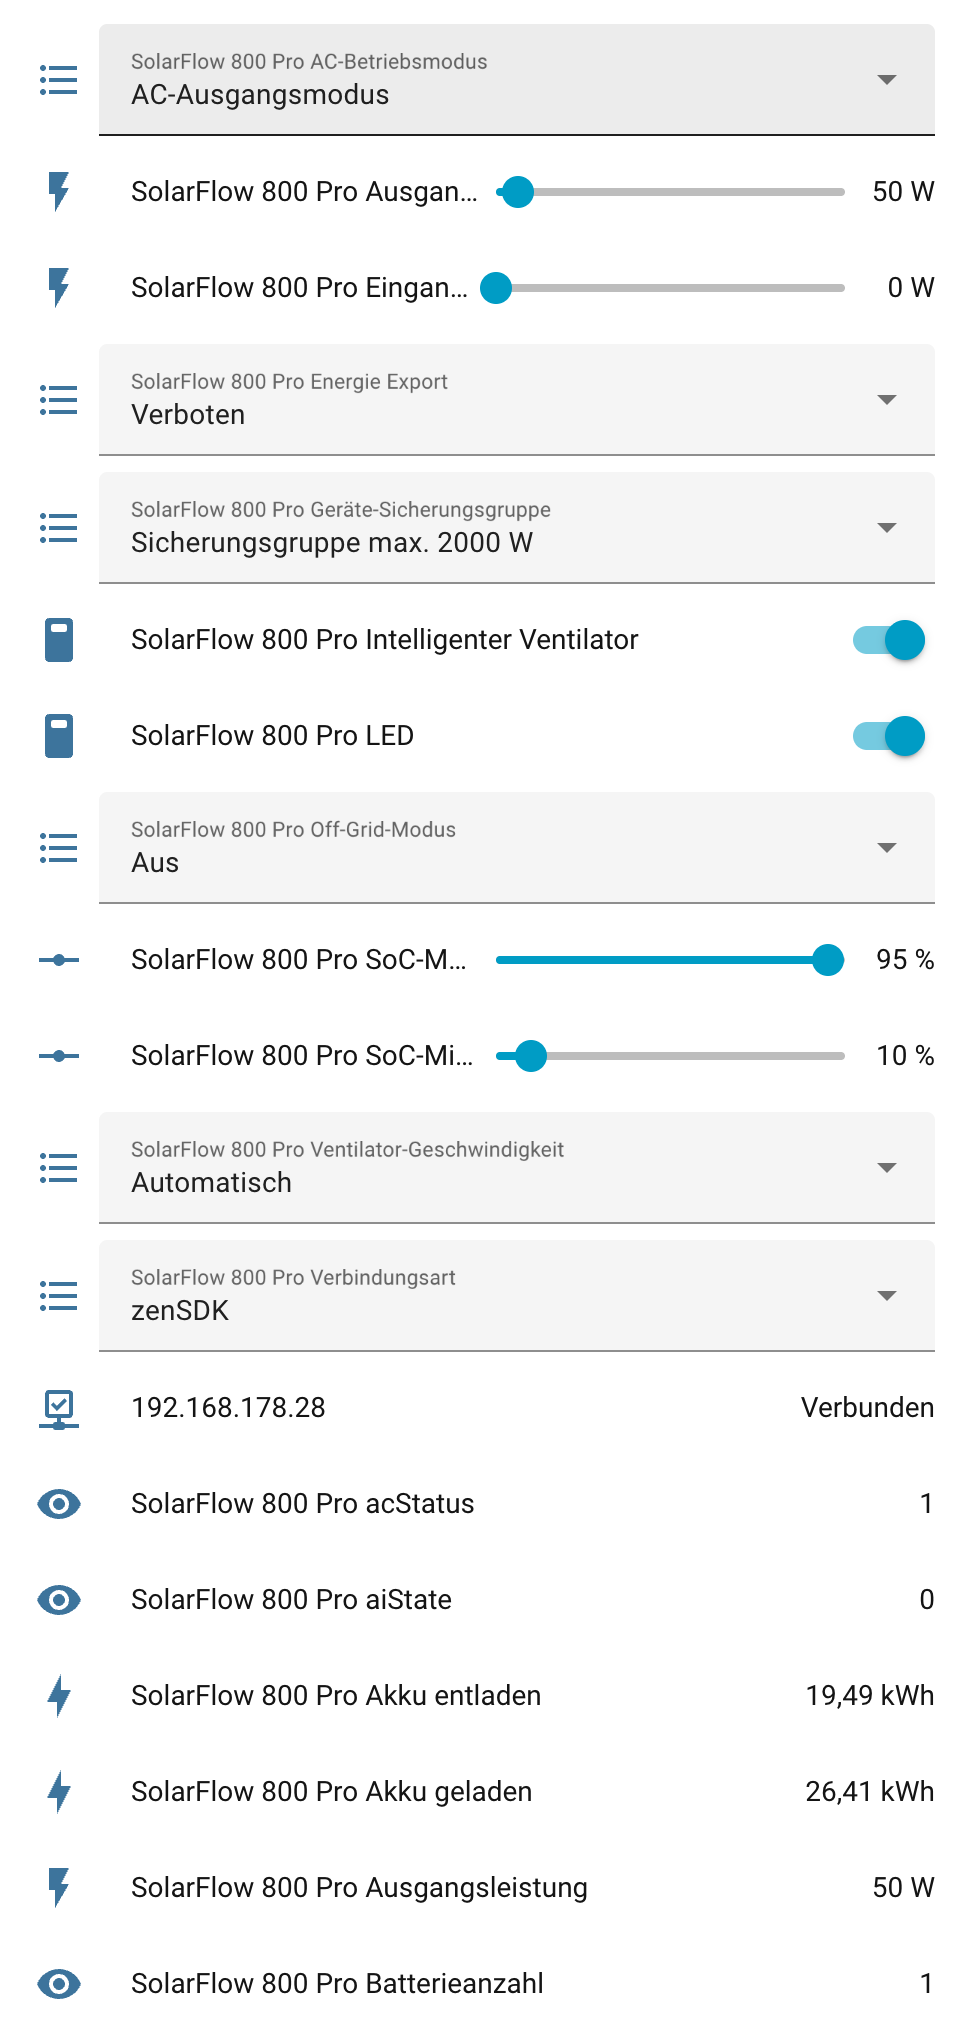
- Real-Time Battery Telemetry: Continuous monitoring of the LiFePO4 battery pack status, including accurate State of Charge (SoC) percentages, battery temperature, health diagnostics, and remaining charge/discharge times.
- Power Flow Tracking: Real-time tracking of dynamic energy distribution, mapping precise wattage data for PV module input (via individual MPPT trackers), DC/AC power input, and total power output to the microinverter or household loads.
- Granular Charge Settings Management: Direct control over system parameters, allowing users to programmatically toggle charging priorities, set upper and lower battery SoC thresholds, adjust dual-MPPT allocation, and dynamically alter output limits.
- System Control & Mode Switching: Instant adjustment of operational modes (such as Appointment Mode, Priority Mode, or Manual Discharge Mode) via Home Assistant switches, allowing the system to adapt instantaneously to broader smart home automation scripts.
¶ Home Assistant Integration Guide: Step by Step
To successfully bridge your Zendure hardware with your Home Assistant (HA) environment, you must deploy the custom integration via the Home Assistant Community Store (HACS). Below is the step-by-step technical execution plan for establishing this connection:
¶ Environment Prerequisites
Before integrating Zendure devices with Home Assistant, please ensure the following basic environment is in place:
¶ 1. Home Assistant Server
A running Home Assistant instance is required.
Supported deployment options include:
- Raspberry Pi
- Mini PC/ NUC
- Virtual Machine (VM)
- Docker environment
¶ 2. Network Connectivity
The Home Assistant server must have stable network connectivity.
¶ Step 1: System Prerequisites and Sub-Account Configuration
- 1.1 Ensure you are running a fully operational Home Assistant instance with HACS correctly installed and configured.
- 1.2 Verify that you have your Zendure account token ready. Utilizing a dedicated secondary "sub-account" is highly recommended to prevent token timeouts and session conflicts with the official Zendure mobile application.
Note about Sub-Account
The Zendure API architecture currently enforces a strict single-session limit per account. Attempting to authenticate the same account on both the Zendure mobile app and the Home Assistant polling client simultaneously will trigger session conflicts, resulting in continuous forced logouts on your mobile device. By provisioning a shared sub-account dedicated solely to Home Assistant, you bypass this token limitation, ensuring an uninterrupted telemetry stream to your local server whilst fully preserving the functionality of your primary mobile application.
If you don't have a secondary account, please read the following instructions to creat a new one:
- 1. Sub-Account Creation: Open the official Zendure mobile application and register a new, secondary account using a different email address.
- 2. Primary Account Device Sharing: Log out, then re-authenticate the application using your primary Zendure account credentials. Navigate to your device settings, select the Share Device function, and dispatch an invitation to your newly created secondary account.
- 3. Invitation Acceptance: Log out of the primary account and log back into the app using the secondary account credentials. Locate and accept the pending device sharing request.
- 4. Final Environment Allocation: Log out of the secondary account and re-authenticate the mobile app using your primary account for everyday mobile monitoring. You will now use the secondary account credentials exclusively when configuring the Home Assistant integration.
¶ Step 2: Locating and Installing the Integration via HACS
With your sub-account successfully provisioned, you may proceed to install the integration directly through the Home Assistant Community Store (HACS).
2.1 Navigate to HACS: Open your Home Assistant dashboard and select HACS from the primary sidebar.
2.2 Search for Zendure: Utilise the search bar and enter “Zendure Home Assistant Integration”.
2.3 Download and Install: Locate the correct Zendure integration within the search results and select it. Click the Download button positioned in the bottom right-hand corner. Follow any subsequent on-screen dialogue boxes to finalise the integration download.
2.4 System Restart: Upon a successful download, it is highly recommended to restart your Home Assistant instance (navigate to Settings > Restart required) to ensure the newly fetched integration files are correctly initialised within the system architecture.
¶ Step 3: Initialising and Authenticating the Integration
Once Home Assistant has successfully rebooted, you must add the Zendure integration to your active services and authenticate it using the dedicated sub-account established in Step 1.
3.1 Access Devices & Services: Navigate to Settings > Devices & Services from your Home Assistant sidebar.
3.2 Add Integration: Click the + Add Integration button, typically situated in the bottom right-hand corner.
3.3 Locate Zendure: Type "Zendure” into the search field and select the integration from the resulting list.
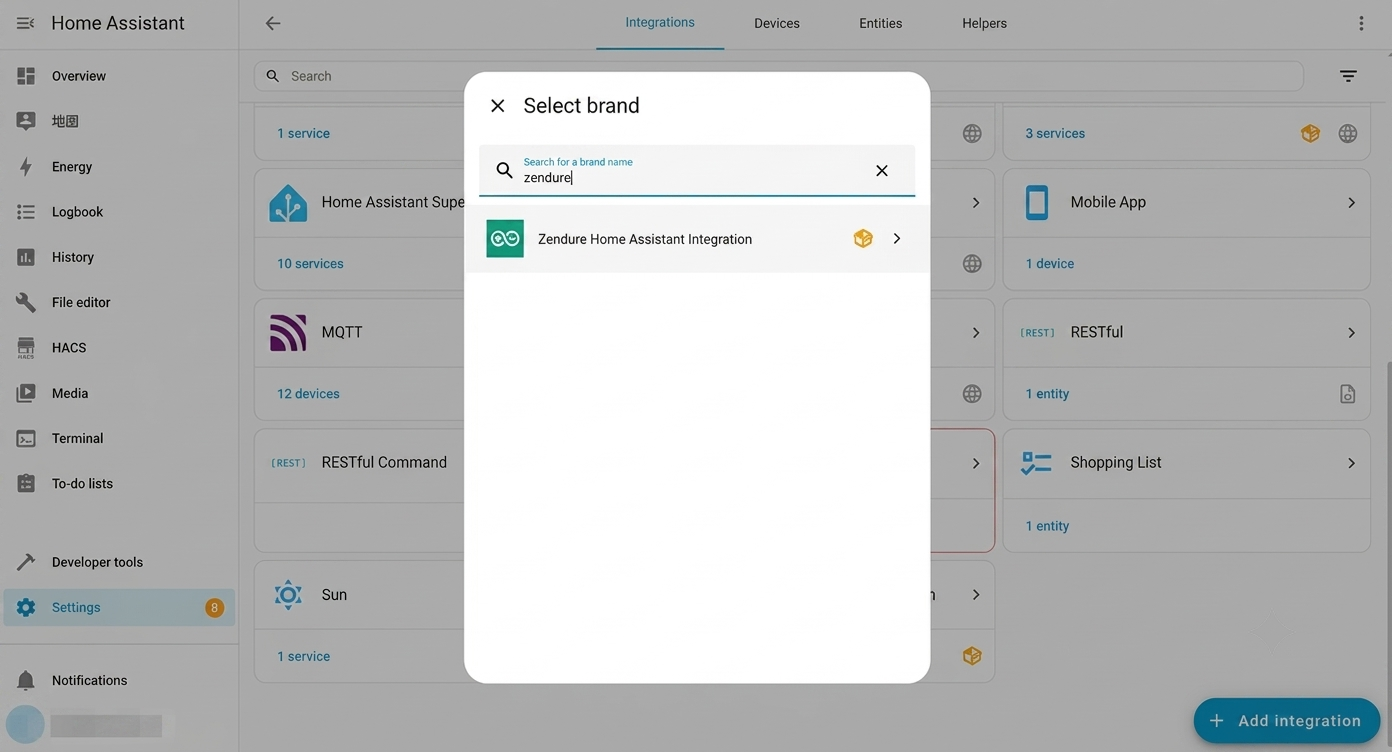
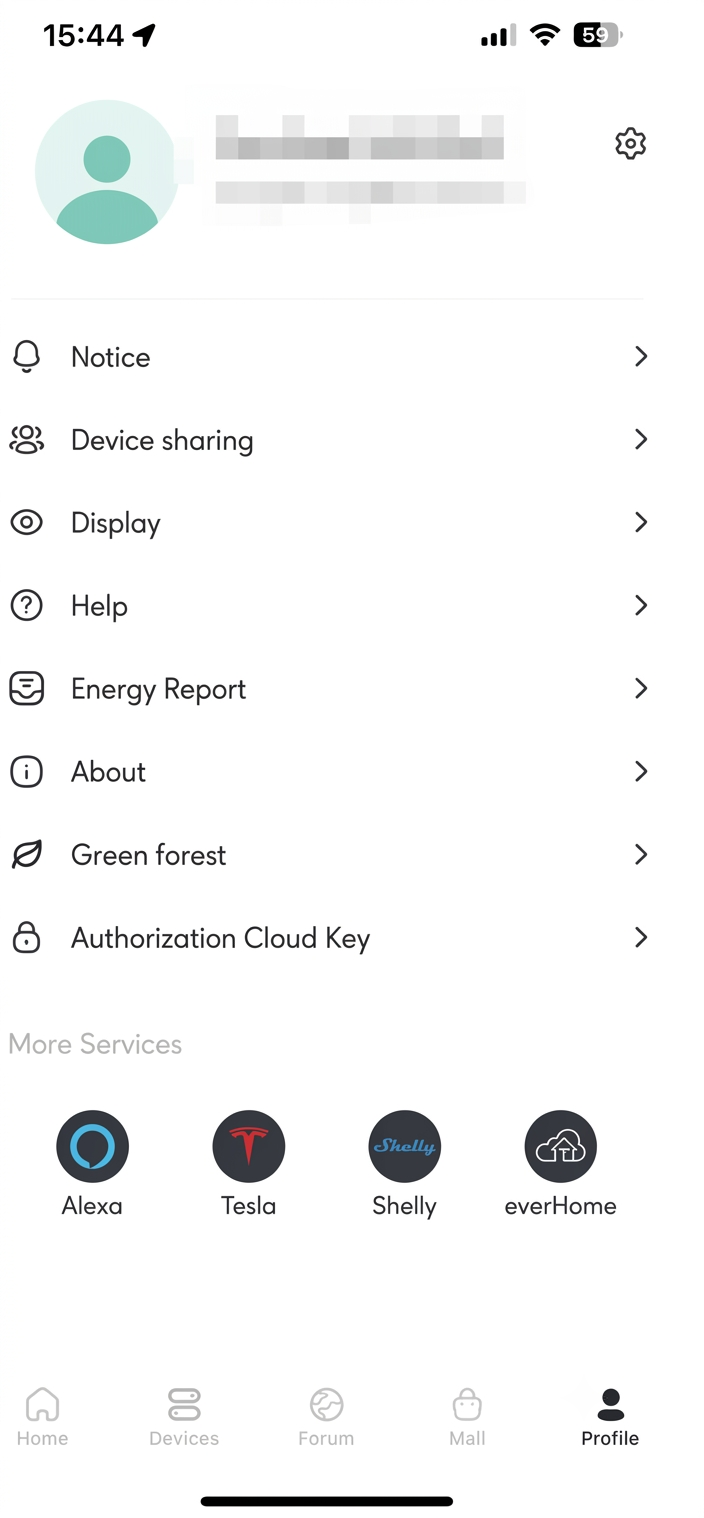
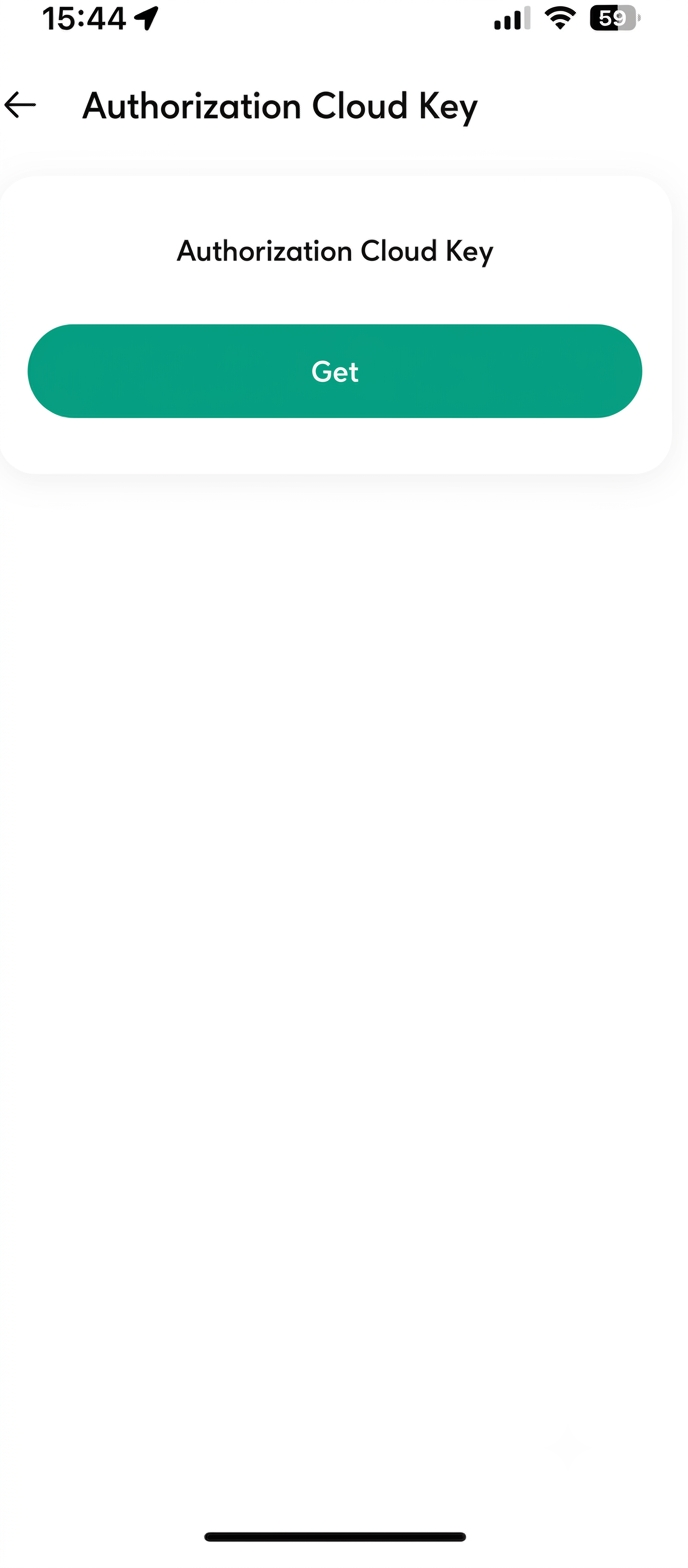
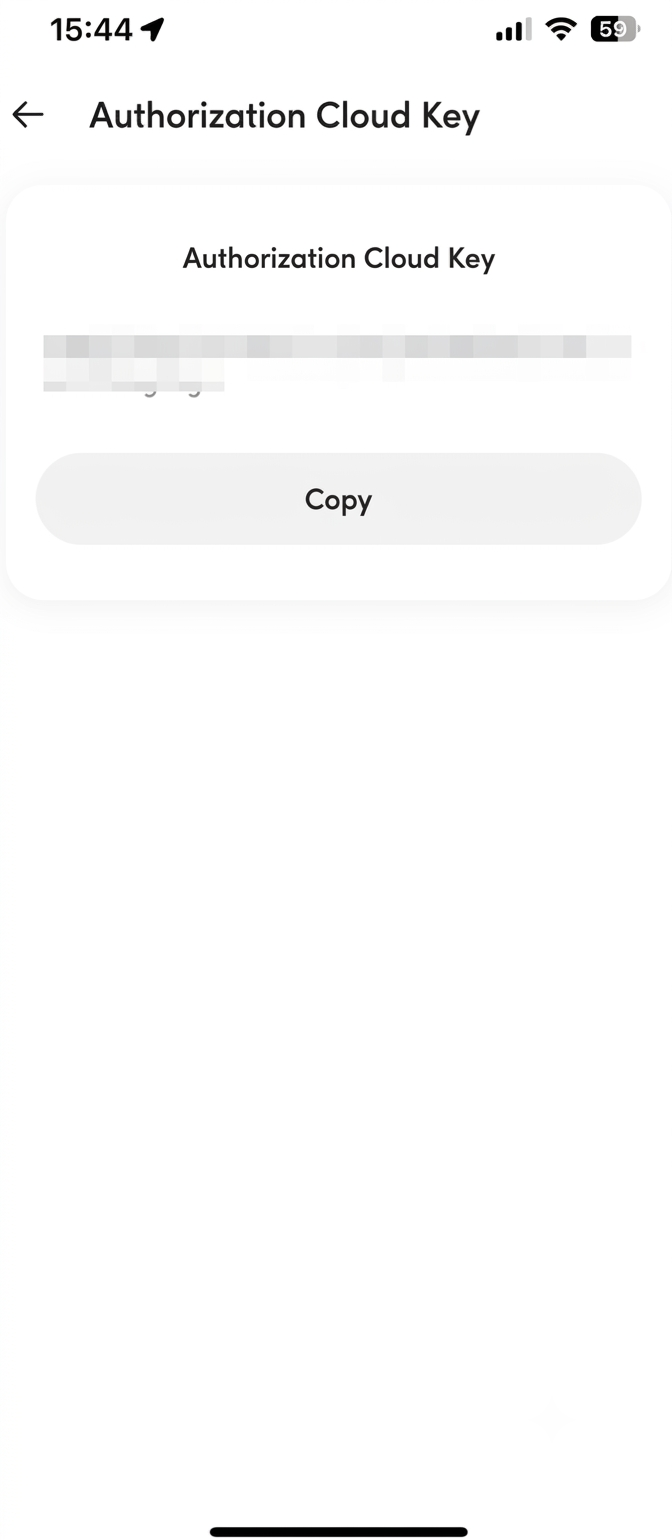
3.4 Authentication: A configuration prompt will appear. Simply input your specific Zendure Token of your secondary sub-account into the dialogue box. (Note: You can easily locate your unique token within the “Profile” section of the official Zendure mobile application and tap “Authorization Cloud Key”).
|
|
|
3.5 Finalisation: After entering your Zendure Token, press Submit. Home Assistant will instantly authenticate via the Zendure cloud API, discover your hardware, and automatically populate the corresponding devices and telemetry entities within your local dashboard.
¶ Local MQTT Configuration Guide
For users seeking total privacy and isolation from cloud services, configuring local MQTT is the definitive solution. This guide details the procedure for transitioning legacy Zendure devices to a fully local MQTT environment within Home Assistant.
Please note:
The following advanced operations are predicated upon the successful completion of your initial Home Assistant (HA) configuration and the baseline setup of the Zendure integration.
If a device is added to Zendure HEMS, it will be unable to use MQTT integration. The Priority is Zendure HEMS>MQTT.
¶ Phase 1: Establish the Local MQTT Broker
Your Home Assistant instance must be equipped to receive and route MQTT messages from your Zendure hardware, to realize it, you must:
1.1 Install Mosquitto Broker: Navigate to Settings > Add-ons > Add-on Store in Home Assistant. Locate and install the Mosquitto broker.
1.2 View Service detail: Once successfully installed, locate the Mosquitto broker in your Add-ons list and click on it. Navigate to the Configuration tab; at the bottom of this page, you can review the relevant MQTT interface details.
1.3 Create a Dedicated MQTT Account: For secure communication, navigate to Settings > People > Users. Create a dedicated local user specifically for MQTT authentication (e.g., Username: zendure_local, alongside a secure password). The Mosquitto broker will automatically inherit and utilise these credentials for device authentication.
1.4 Enable the MQTT Integration: Return to Settings and click on Devices & Services. You will notice that MQTT has appeared as a new 'discovered' integration on the page. Click Configure and validate the settings to complete the MQTT integration setup.
¶ Phase 2: Direct Zendure Devices to the Local Server
With the broker running, you must now point your Zendure hardware to your local Home Assistant server instead of the Zendure Cloud.
¶ Preferred Method (Via the Latest Zendure App):
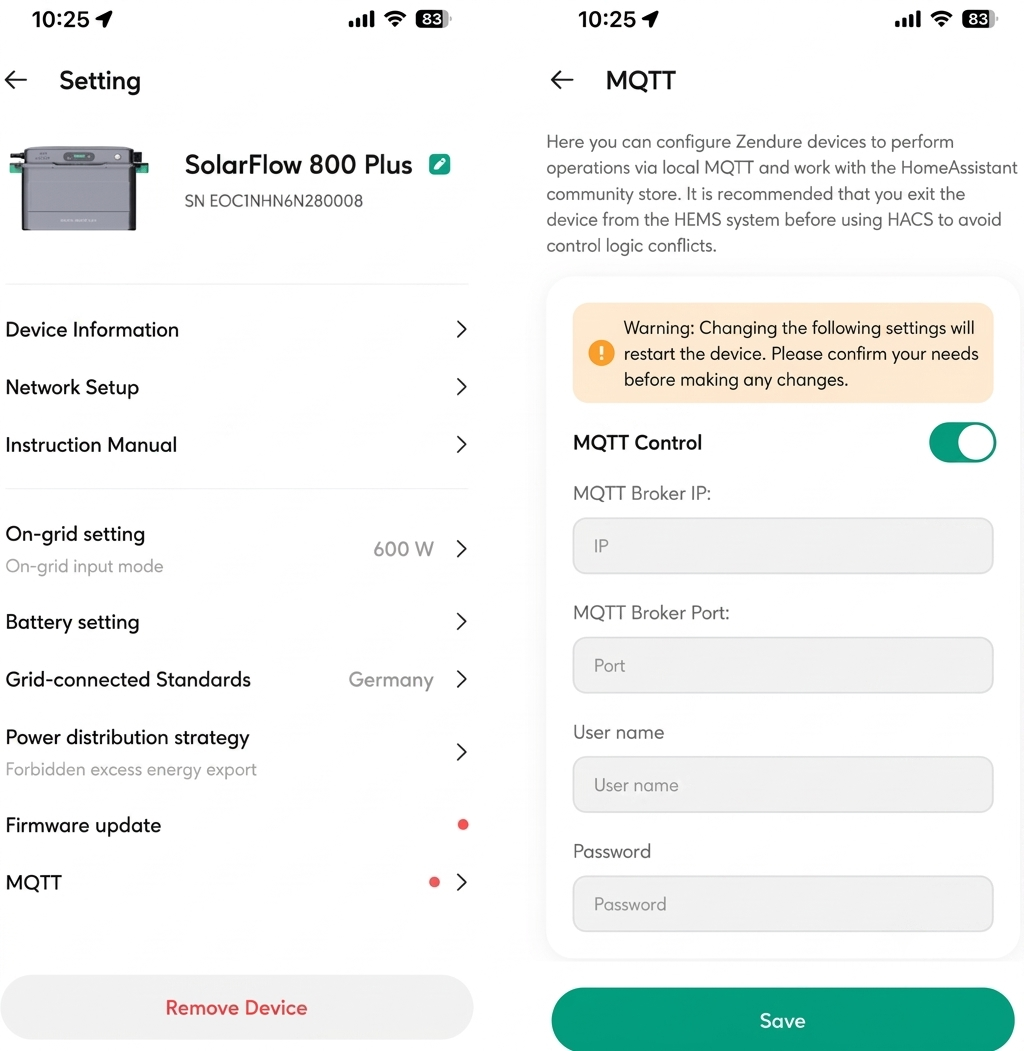
In the latest firmware and Zendure App versions, you can access the advanced settings interface for your target device (e.g., SolarFlow or Smart Meter). Locate the Network or MQTT configuration options and manually change the server from the default Zendure Cloud to your Home Assistant's local IP address (e.g., 192.168.x.x). Set the port to 1883 and input the zendure_local credentials you created in Phase 1.
¶ Alternative Method (Via Zendure-HA Bluetooth Config Tool)
If you are using legacy devices (e.g., Hyper 2000, Hub 2000, Hub 1200 and Ace 1500) or the option is not explicitly available in the app, the Zendure-HA community provides a Web Bluetooth-based configuration tool.
- Ensure your computer or smartphone has Bluetooth enabled and is near the device.
- Access the local switching webpage provided in the integration documentation.
- Upon connecting to the device, directly transmit your local HA server's IP address, port (
1883), and thezendure_localaccount credentials. - Once configured, the device will automatically reboot and connect to your local area network broker rather than the cloud.
¶ Phase 3: Reconfigure the HA Integration
Now that the hardware is broadcasting telemetry data locally, you must reconfigure the Zendure Home Assistant Integration to receive the correct local data stream.
3.1 Access Integration Settings: In Home Assistant, navigate to Settings > Devices & Services and locate your added Zendure integration.
3.2 Switch to Local Mode: Click Configure. In the pop-up options, switch the communication protocol from the default "Cloud MQTT" to Local MQTT by choosing “Use local MQTT”.
3.3 Input Broker Credentials: Following this selection, you will be prompted to provide the specific connection details for your local setup. Please complete the fields as follows:
- MQTT Server: Enter the local IP address where your MQTT broker is hosted.
- MQTT Port: Input 1883 (the standard port for unencrypted MQTT traffic).
- MQTT User: Provide the dedicated username established for server authentication (e.g., zendure_local).
- MQTT Password(mqttpsw): Enter the corresponding password for your authentication user.
- Wi-Fi SSID & Wi-Fi Password: Input your local wireless network credentials; these are essential for the system to successfully reconfigure your Zendure hardware.
3.4 Finalise and Assign: Once you have submitted these details, you will have the option to assign the newly configured device to a specific room within your Home Assistant dashboard. You may customise this location or simply bypass it to complete the MQTT linkage.
¶ FAQ
¶ How do I find the required MQTT Broker IP Address?
For users struggling to locate the IP address required to bridge their Zendure hardware with their Local MQTT Broker, please follow these steps:
- Method A (Via Home Assistant): Log into your Home Assistant dashboard. Navigate to Settings > System > Network. Look under the "Network Adapter" or "IPv4" section. The IP address listed here (e.g.,
192.168.1.100) is the address of your Home Assistant server, which is almost always the same as your MQTT Broker if you are running the Mosquitto Add-on. - Method B (Via Router): Log into your home router's admin panel (usually
192.168.0.1or192.168.1.1). Go to the DHCP Client List or Connected Devices page. Look for a device namedhomeassistantorraspberrypi. The IPv4 address listed next to it is your MQTT IP.
¶ Why are my Zendure entities showing as "Unavailable" in Home Assistant?
If your entities are greyed out or marked "Unavailable", check the following:
- Wi-Fi Signal: Ensure your Zendure inverter has a strong Wi-Fi connection. A weak signal causes intermittent telemetry drops.
- Broker Authentication: Verify that the MQTT Username and Password entered in the Zendure App perfectly match the credentials created in your Mosquitto Broker configuration.
- Legacy Device Firmware: If you are using a legacy Zendure device, ensure your firmware is updated to the latest version via the Zendure App, as older versions do not support the Local MQTT broadcast feature.
¶ I switched to Local MQTT, but the Zendure App lost connection. Is this normal?
Yes. When you switch your Zendure device to Local MQTT, it stops broadcasting telemetry to Zendure's cloud servers and restricts communication strictly to your local network. Consequently, the official Zendure App (which relies on cloud data) will no longer display real-time statistics. To regain App functionality, you must revert the settings to Cloud MQTT.
¶ Can I use Cloud MQTT and Local MQTT simultaneously?
Currently, Zendure devices operate on an "either-or" protocol for their MQTT broadcasts. You must choose between sending data to the Zendure Cloud (for official app usage) OR your Local MQTT broker (for local Home Assistant control). Note: Some advanced Home Assistant users utilise a cloud-polling integration instead of Local MQTT if they wish to retain official app functionality, though this sacrifices local control speed.
¶ Connection Refused / Port 1883 Errors
If your Zendure device cannot connect to the broker:
- Verify that port
1883is open and not being blocked by a local firewall on your Home Assistant host. - Ensure that no other add-ons or containers are conflicting and actively using port 1883.
- Double-check that you haven't accidentally entered
mqtt://before the IP address in the configuration; it requires just the raw IPv4 address (e.g.,192.168.1.50).